Multi-Region Kubernetes - EKS and Terraform 0.12
Any technology you adopt today is a technology you’re going to have to troubleshoot tomorrow. - Anonymous
But why EKS and Kubernetes at all?
Kubernetes is the hot stuff these days. Without a doubt, some of the benefits that it offers are impressive. It is a portable, extensible, open-source platform for managing containerized applications with declarative configuration and automation.
The following list is only a small subset of the features it provides:
- Scaling
- Deployment strategies
- Container balancing
- Service Discovery
- Resource monitoring and logging
- Self-healing
It all looks appealing and very promising, but the ultimate question is, do we really need it?
Apart from the obvious benefit of having an all-in-one standardized solution that we can run our containers on, it is quite difficult to say. Unfortunately for most of the companies, it is probably not necessary. Of course, there is always the minority, companies that are required to operate under strict compliance policies, like having their hardware in-house in multiple data centers. Besides that, the times where we run one (or a few) applications per server are long gone. The intricacy of working in a team especially a large one supplements the difficulty, which by itself is one of the hardest hurdles to overcome, and we all know that that there is no perfect, out-of-the-box solution.
Having said that, running and managing a Kubernetes cluster can be a daunting job, but as with the other tech tools at hand, combined with the strive in finding the “sweet spot” between outsourcing them and creating or maintaining the smallest possible subset of them, Kubernetes ultimately improves stability, reliability, speed, and costs.
So let us explore how easy is to get a Multi-Region EKS cluster setup up and running.
The judgment of sacrificing either speed or stability is the bane of the engineering world.
The Amazon Elastic Container Service for Kubernetes tries to ease some of the sophistication that comes with Kubernetes with it’s offering, by extracting and managing one of the most important components of it, the Control Plane.
It has the following additional features:
- High availability
- Control Plane logging to AWS CloudWatch
- Managed updates
- Backup
- Integration with other AWS services
- Service mesh
- Fine-Grained IAM Roles for Service Accounts
- Container Storage Interface (CSI)
One of the finest features of EKS is that it is a certified Kubernetes conformant, meaning that the applications running on it are fully compatible with any standard Kubernetes environment and vice versa.
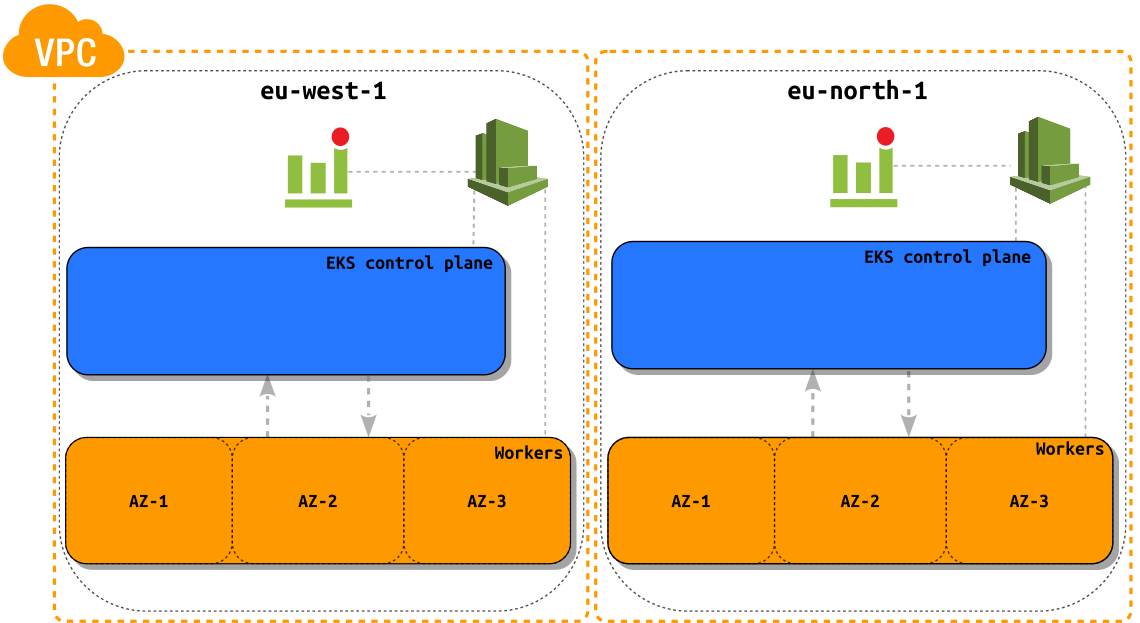
To determine whether EKS is the right tool for the job we would need to get it working. For this, I will demonstrate how we can run a Kubernetes cluster on AWS EKS in two separate regions by using the latest iteration of Terraform as our Infrastructure as Code/Software tool.
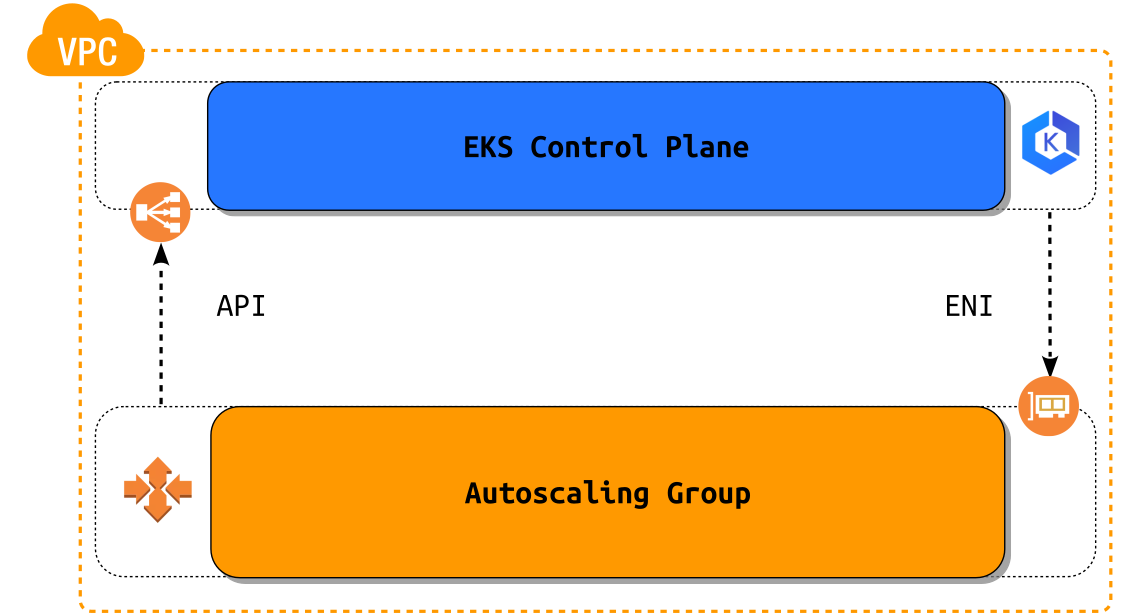
First let us see how AWS has managed to implement Kubernetes, with a simplified overview of its architecture. The EKS API is exposed via a Network Load Balancer on which we can orchestrate the cluster with kubectl and where the worker nodes connect to. Communication between the control plane and the worker nodes is done through an ENI interface.
Before we begin with the technicalities some considerations need to be taken into account:
DNS
- The VPC needs to have DNS hostname and DNS resolution support enabled.
IAM
- If we would like to have some of the resources in Kubernetes exposed via Route53 with a tool like ExternalDNS then we shouldn’t forget about setting the correct IAM permissions (they are out of scope for this blog post).
Networking
-
Private-only: Everything runs in a private subnet and Kubernetes cannot create internet-facing load balancers for your pods.
-
Public-only: Everything runs in a public subnet, including your worker nodes.
Tagging Requirements
The following tags should be set on the respective resources so that Kubernetes can discover them.
Subnet
kubernetes.io/cluster/<cluster-name> = shared
VPC
kubernetes.io/cluster/<cluster-name> = shared
Worker Nodes
kubernetes.io/cluster/<cluster-name> = owned
Terraform
- Please make sure you have the latest version of terraform installed on your system or any version bigger than 0.12.
- The terraform examples can be found here, which will be needed for the creation of the clusters and the accompanying resources.
Now that we have that out of the way and we have gained an overview on how AWS has put Kubernetes into operation, we can safely head on to creating two clusters in two separate regions.
Time for some fun with terraform.
I will be using terraform workspaces with which I can conveniently use single set of templates within a single backend and with that I can create clusters in as many regions as I want just by using one single configuration set.
By creating a local variable local.region I have implemented a simple check that detects whether the workspace is default one, which will subsequently stop terraform plan/apply. Setting a bogus region will render this check useless but plan/apply will fail nevertheless.
locals {
  region = terraform.workspace == "default" ? "!!!Please set the terraform workspace to a valid region!!!" : terraform.workspace
}
Then in turn I am using the local variable local.region in the aws provider configuration.
provider "aws" {
  version = "~> 2.27.0"

  profile = local.profile
  region  = local.region
}
Now, before jumping on creating the clusters, we need to make sure we have the desired workspaces created since they will represent the regions. If we do not have them set, we should do it now.
I will be operating in the regions “eu-west-1” and “eu-west-2”
The terraform commands should be executed in the folder where the terraform templates are
$ terraform workspace new eu-west-1
Created and switched to workspace "eu-west-1"!

You're now on a new, empty workspace. Workspaces isolate their state,
so if you run "terraform plan" Terraform will not see any existing state
for this configuration.
After we have the workspaces created we can list them and verify which one we are working on (denoted with an asterisk).
terraform workspace list
  default
* eu-west-1
  eu-west-2
With the workspace select we can conveniently switch between workspaces.
terraform workspace select eu-west-2
Switched to workspace "eu-west-2".
With terraform workspaces we are using the same set of templates without duplication and we are sort of “branching out” by changing the workspace which is considered as separate terraform state, consequently spliting the infrastructure into two separate regions.
And one more thing before applying the terraform configuration, please make sure you have replaced the following local variables so that they represent your local setup:
locals {
  profile     = "testbed"
  allowed_ips = ["0.0.0.0/0"]
  key_name    = ""
}
We can now finally apply terraform, by running:
terraform apply
Initially, I wanted to include the details for configuring kubectl, but because it is a lot of information and there already is more than enough, I have decided that it should stay out of the scope for this blog post. From this point on I will assume that kubectl is set up and working properly.
After terraform apply has finished we will see the resources created in the AWS console, but there is still some work left to connect the workers to the EKS control plane. What we can do at this point is, to validate if the cluster and kubectl are working as intended, and the simplest confirmation that we can do is, kubectl cluster-info which should give us output similar to this.
$ kubectl cluster-info
Kubernetes master is running at https://5E80D2AFE1D478990138A7FCE4038714.yl4.eu-west-1.eks.amazonaws.com
CoreDNS is running at https://5E80D2AFE1D478990138A7FCE4038714.yl4.eu-west-1.eks.amazonaws.com/api/v1/namespaces/kube-system/services/kube-dns:dns/proxy

To further debug and diagnose cluster problems, use 'kubectl cluster-info dump'.
Unfortunately, we are not there, yet.
The EKS service does not provide a cluster-level API parameter or resource to automatically configure the workers to join the EKS control plane via AWS IAM authentication, so we would need to get the ConfigMaps from terraform’s config_map_aws_auth output and apply it with kubectl apply -f
That output will contain the following yaml data:
Please note that in the place of <AWS_ACCOUNT_ID> you should see your current AWS account id
apiVersion: v1
kind: ConfigMap
metadata:
  name: aws-auth
  namespace: kube-system
data:
  mapRoles: |
    - rolearn: arn:aws:iam::<AWS_ACCOUNT_ID>:role/eks-worker-eu-west-1-test-cloudlad
      username: system:node:{{EC2PrivateDNSName}}
      groups:
        - system:bootstrappers
        - system:nodes
After applying the ConfigMap we will see the nodes connected to the EKS master.
$ kubectl apply -f config_map_aws_auth.yaml
configmap/aws-auth created
We can confirm with the command kubectl get nodes that the worker nodes are connected to the EKS master.
$ kubectl get nodes
NAME                                        STATUS   ROLES    AGE   VERSION
ip-10-0-102-59.eu-west-1.compute.internal   Ready    <none>   26s   v1.13.8-eks-cd3eb0
ip-10-0-103-79.eu-west-1.compute.internal   Ready    <none>   25s   v1.13.8-eks-cd3eb0
For the sake of completeness here is an example of cluster-info and the nodes connected to the EKS cluster in the eu-west-2 region
$ kubectl cluster-info
Kubernetes master is running at https://D89FEC781B28CA9338FC8C2A13006773.sk1.eu-west-2.eks.amazonaws.com
CoreDNS is running at https://D89FEC781B28CA9338FC8C2A13006773.sk1.eu-west-2.eks.amazonaws.com/api/v1/namespaces/kube-system/services/kube-dns:dns/proxy

To further debug and diagnose cluster problems, use 'kubectl cluster-info dump'.
$ kubectl get nodes
NAME                                         STATUS     ROLES    AGE   VERSION
ip-10-0-102-88.eu-west-2.compute.internal    NotReady   <none>   4s    v1.13.8-eks-cd3eb0
ip-10-0-103-232.eu-west-2.compute.internal   NotReady   <none>   10s   v1.13.8-eks-cd3eb0
In a nutshell, we have successfully created two identical EKS clusters in two separate regions, and we were able to connect the worker nodes with the control plane and to verify that everything is functioning well. In the current state, we are ready to take the next steps e.g. deploying a sample app on Kubernetes but that alone deserves a separate blog post.
If you find this blog post useful and interesting please spread the word by sharing. For any suggestions and proposals feel free to contact me. Thank you for reading!
For those interested in some more details about the terraform implementation please read on.
Terraform configuration details
VPC
For the creation of the VPC, I have settled on using the offical terraform module https://registry.terraform.io/modules/terraform-aws-modules/vpc/aws/2.12.0.
module "vpc" {
  source  = "terraform-aws-modules/vpc/aws"
  version = "2.12.0"

  name = module.label.id
  cidr = local.vpc_cidr

  azs             = ["${local.region}a", "${local.region}b", "${local.region}c"]
  private_subnets = local.private_subnets_cidrs
  public_subnets  = local.public_subnets_cidrs

  enable_nat_gateway = true
  enable_vpn_gateway = true

  # For the EKS workers.
  enable_dns_hostnames = true
  enable_dns_support   = true

  tags = module.label_shared.tags
}
Tags
The real challenge was how to set the tags in a nonrepetitive and useful manner. I’ve used cloudposse’s terraform-null-label which can call itself (works with terraform 0.12 and up only!) and construct a hash of tags for the shared or owned notation for the EKS requirements, and as stated above, the VPC and the subnets will obtain the shared tag and the workers the owned tag.
The following example only works with terraform 0.12 and above.
module "label_owned" {
  source    = "git::https://github.com/cloudposse/terraform-null-label.git?ref=0.15.0"
  stage     = local.stage
  name      = local.name
  namespace = local.region
  delimiter = "-"
  tags = {
    "kubernetes.io/cluster/${module.label_owned.id}" = "owned"
  }
  additional_tag_map = {
    propagate_at_launch = "true"
  }
}
The parameter module.label_owned.id is being used as the EKS cluster name which enables me to call the module within itself "kubernetes.io/cluster/${module.label_owned.id}" = "owned" therefore removing the need for repetition.
ConfigMap
The ConfigMap that we are applying with kubectl is a local variable (see locals.tf) that has the parameter rolearn: computed and interpolated, the rest is written in a standard yaml syntax. It is shown on stdout with terraform outputs (see outputs.tf).
locals {
  config_map_aws_auth = <<CONFIGMAPAWSAUTH
apiVersion: v1
kind: ConfigMap
metadata:
  name: aws-auth
  namespace: kube-system
data:
  mapRoles: |
    - rolearn: ${aws_iam_role.eks_worker.arn}
      username: system:node:{{EC2PrivateDNSName}}
      groups:
        - system:bootstrappers
        - system:nodes
CONFIGMAPAWSAUTH
}

output "config_map_aws_auth" {
  value = local.config_map_aws_auth
}

