IaC Pipelines With Terraform And Cloud Build
“Today, most software exists, not to solve a problem, but to interface with other software.” — IO Angell
In this blog post I’ll be showcasing Cloud Build, a CI/CD service from Google Cloud Platform, evaluating its capabilities and how well it works with Infrastructure as Code (IaC) deployment pipelines.
Infrastructure as Code (IaC)
Chances are you’ve come across the term IaC in your career. Undoubtedly it is the default process for managing and provisioning computational resources. The capability of defining declarative code and storing it in a version control system makes it even more appealing. Not to mention that the process can be automated, tested, re-used, and reviewed. That eventually leads to decreased risk, failure, but an increase in speed, stability, and security.
Simply put, long gone are the days where one would order a plethora of parts just to build a few servers, only to realize that the rack doesn’t fit in the server hall. With IaC and modern Infrastructure as a Service (IaaS) providers, we have almost infinite computational power at our fingertips, if our finances are on par.
GitOps
I can describe GitOps as a natural evolution of IaC that leverages Git as the single source of truth. We request changes with the creation of Pull Requests, which triggers various status checks after every commit. When the changes meet the conditions set for the repository, and we have approved the Pull Request, we can merge it back into the main/master branch. This should automatically trigger an event that deploys the changes into the environments that run the workloads, Figure 1.
 Figure 1. Simplified GitOps pipeline.
With my preferred IaC tool Terraform, the main/master branch should report no changes when run against the infrastructure. It should always reflect the state of the currently running resources. This way we ensure the consistency of the Git Flow, which is especially important when collaborating within a team.
Cloud Build and Terraform
But what good is a deploy pipeline without a CI/CD service? Cloud Build comes with full CI/CD capability with which we can automate Terraform.
One of the challenges of the engineering teams is avoiding the creation of a so-called “silo”. It is prominent when working with infrastructure. A “silo” happens when the generic processes that apply for engineering do not apply to IaC that might lead to the unintentional creation of a “silo”. Tools like Terraform and Cloud Build help in bridging that gap or at least solving part of it.
Security is a subject that we must not neglect. It plays a big part in the CI/CD service selection. Having owner-level permission for a Google Cloud Project is something that I want to avoid managing and sharing via hard-coded secrets.
I am about to show a setup that has a lot of moving parts. The concepts and components are listed below for clarity. Head on to the Implementation section if you are already familiar with them.
Concepts
Terraform State
A Terraform state is an object that keeps track of the managed infrastructure and configuration. It can be both local and remote. Remote states are more or less a requirement, especially when working in a team. To use a remote state, we have to solve the “Chicken or the egg” problem. E.g., If we want to put the Terraform state on a GCP storage bucket, we first need to create that bucket with Terraform and then migrate the state. Another peculiarity is state locking. Terraform automatically locks the state for all operations that could write to it, thus preventing others from running Terraform. The need for a queuing mechanism is obvious.
Principle of Least Privilege (PoLP)
PoLP is a concept in which we give an entity a minimum level of access. It should have access to only the information needed for its purpose.
Inert vs. Active Terraform States
This concept stems from the Terraform’s behaviour. Big states that manage a lot of resources are slow to plan/apply. Together with state locking and PoLP, the need for splitting the states is clear. These so-called “Inert States” change less often than the “Active States”. E.g., we control the creation of GCP projects with one state but manage the resources of said projects in other states.
Furthermore, both Inert and Active states require a different level of permissions.
This approach brings the attack surface and blast radius to a minimum, but increases the speed of operation and security.
Implementation
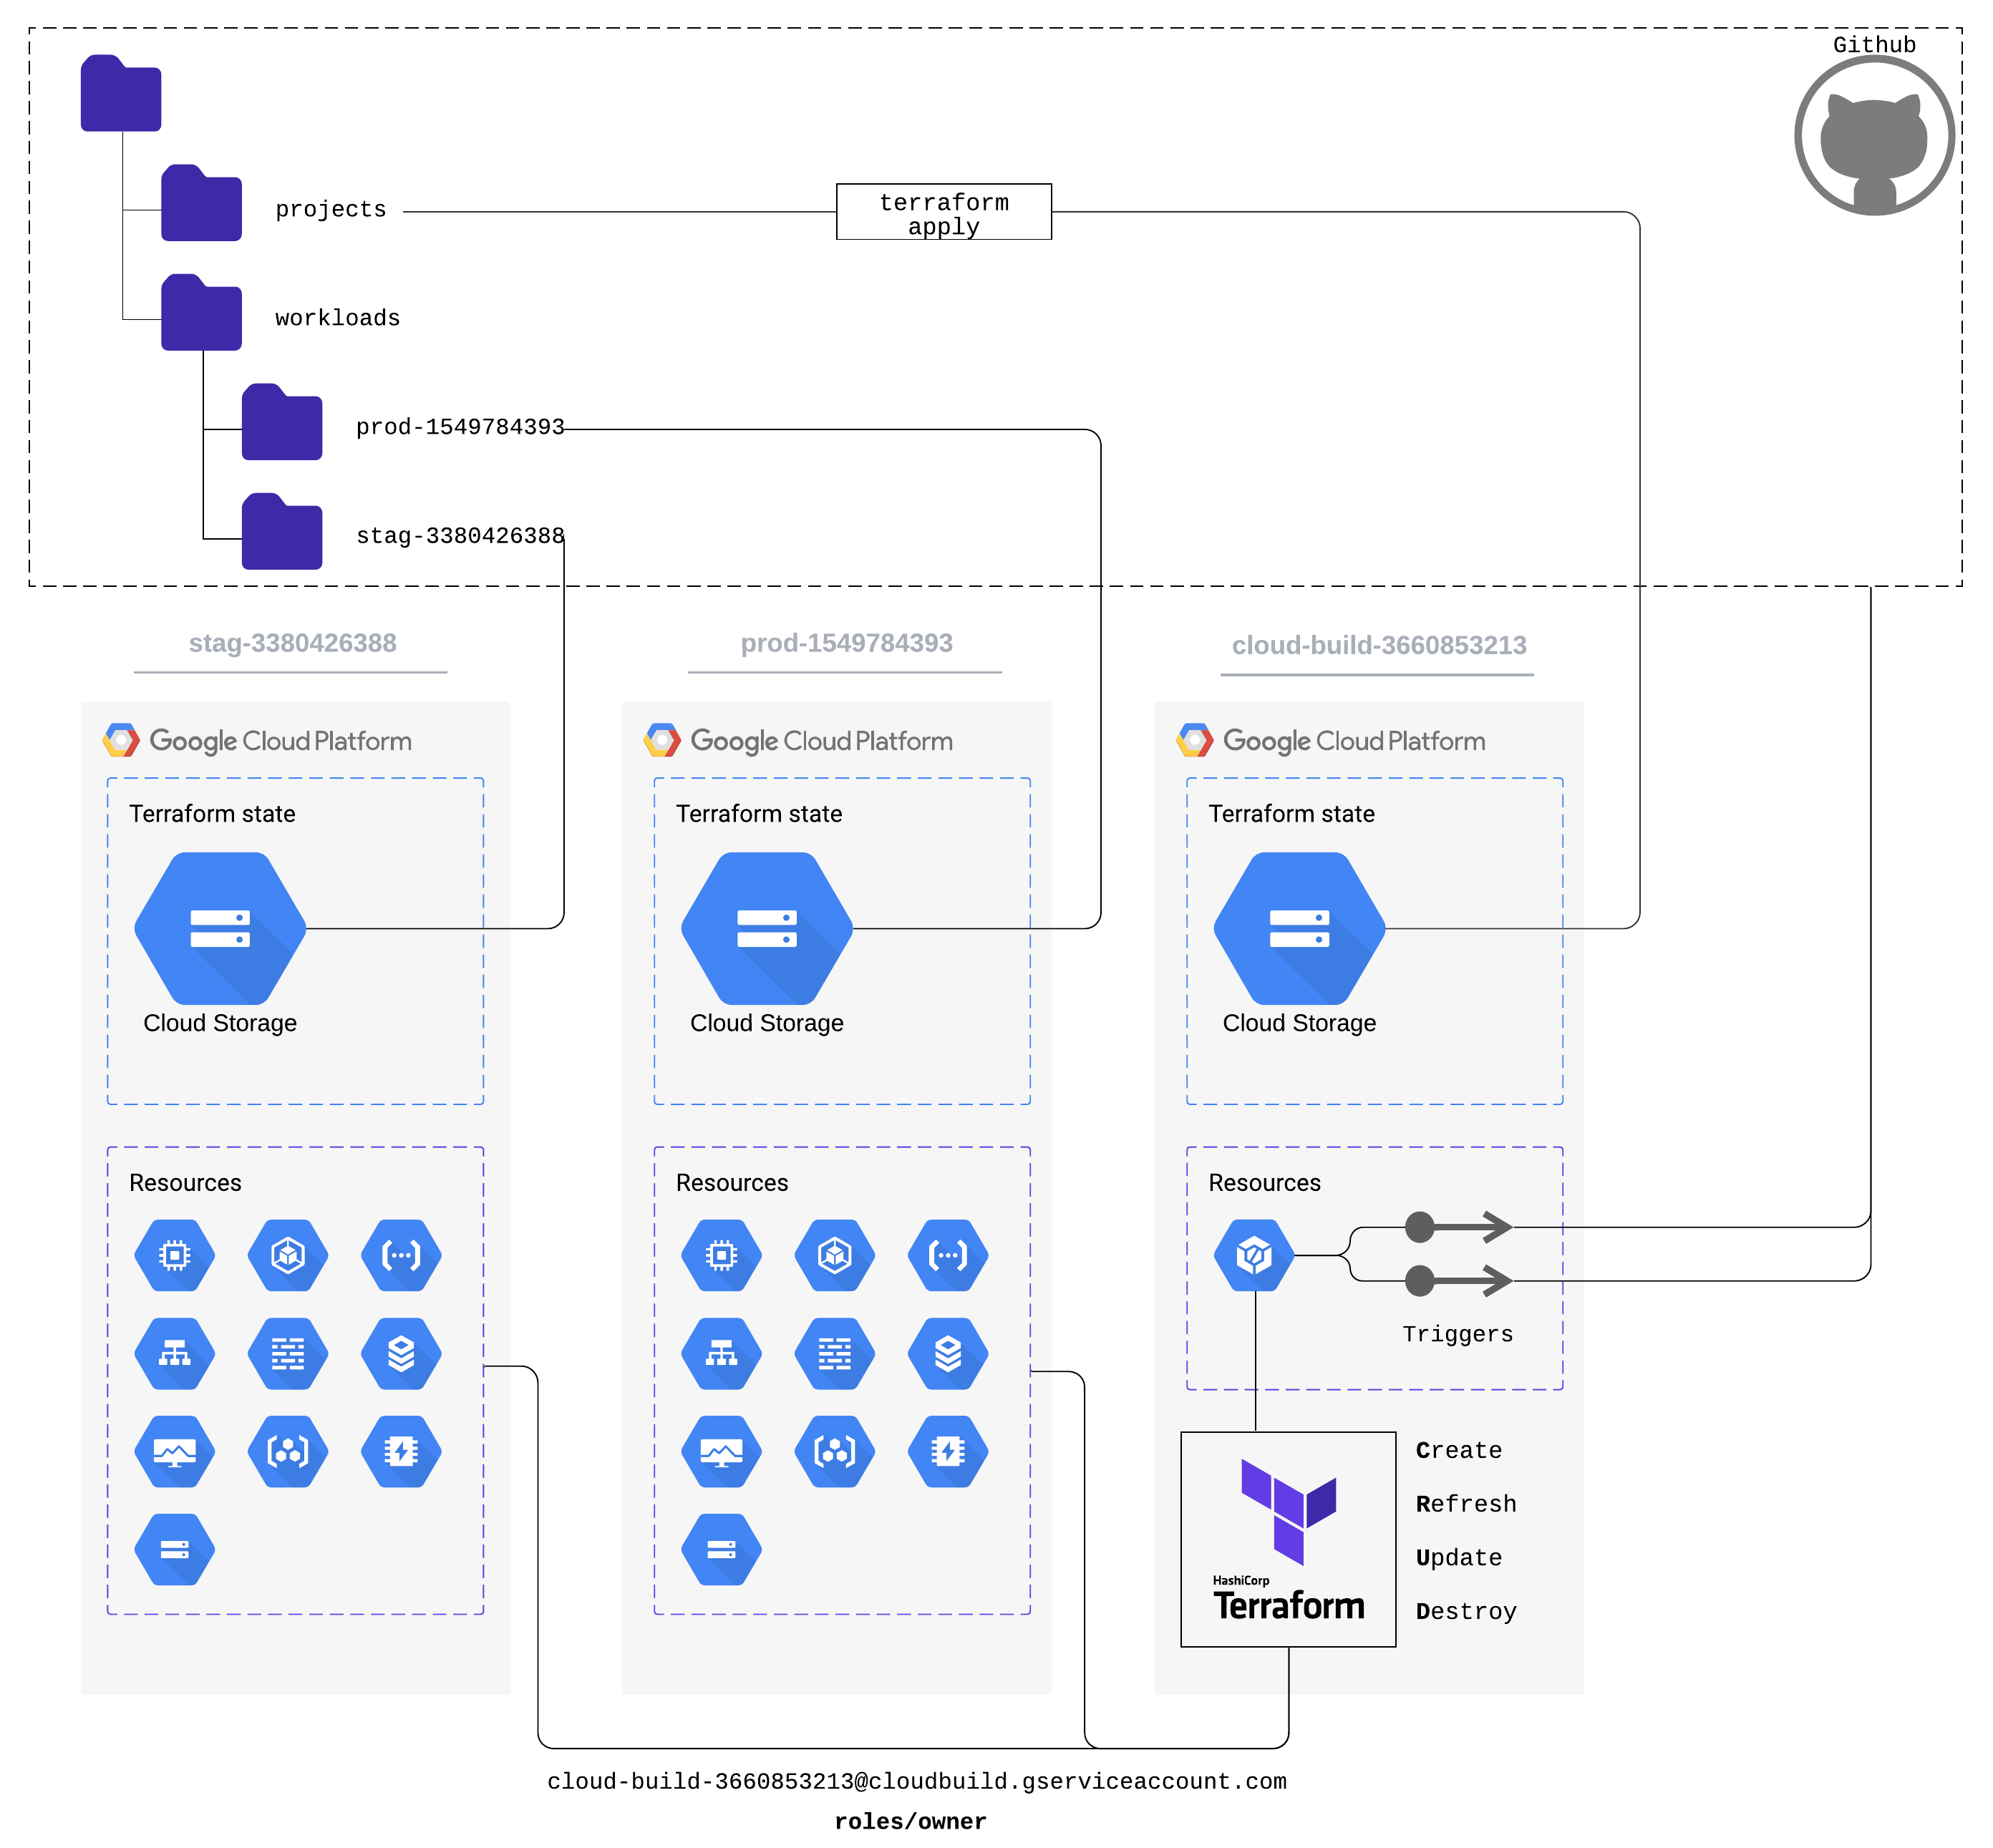 Figure 2. IaC pipeline with Cloud Build.
Let us have a look at the following directory structure:
.
├── projects # Applied manually, creates the GCP projects
└── workloads
    ├── prod-1549784393 # Applied automatically, creates resources in prod-1549784393 GCP project
    └── stag-3380426388 # Applied automatically, creates resources in stag-3380426388 GCP project
There are three Terraform states. The folder names under the workloads directory correspond to the names of the GCP projects inside the projects directory.
projects - Inert Terraform State
The projects folder holds the state for creating all GCP projects: cloud-build-3660853213, prod-1549784393, stag-3380426387 that must be applied manually. It requires permissions for creating GCP projects.
prod-1549784393 - Active Terraform State
The prod-1549784393 folder holds the state of the resources in the prod-1549784393 GCP project. Cloud Build runs it automatically. It requires owner permissions for the project prod-1549784393.
stag-3380426388 - Active Terraform State
The stag-3380426388 folder holds the state of the resources in the stag-3380426388 GCP project. Cloud Build runs it automatically. It requires owner permissions for the project stag-3380426388.
Cloud Build triggers
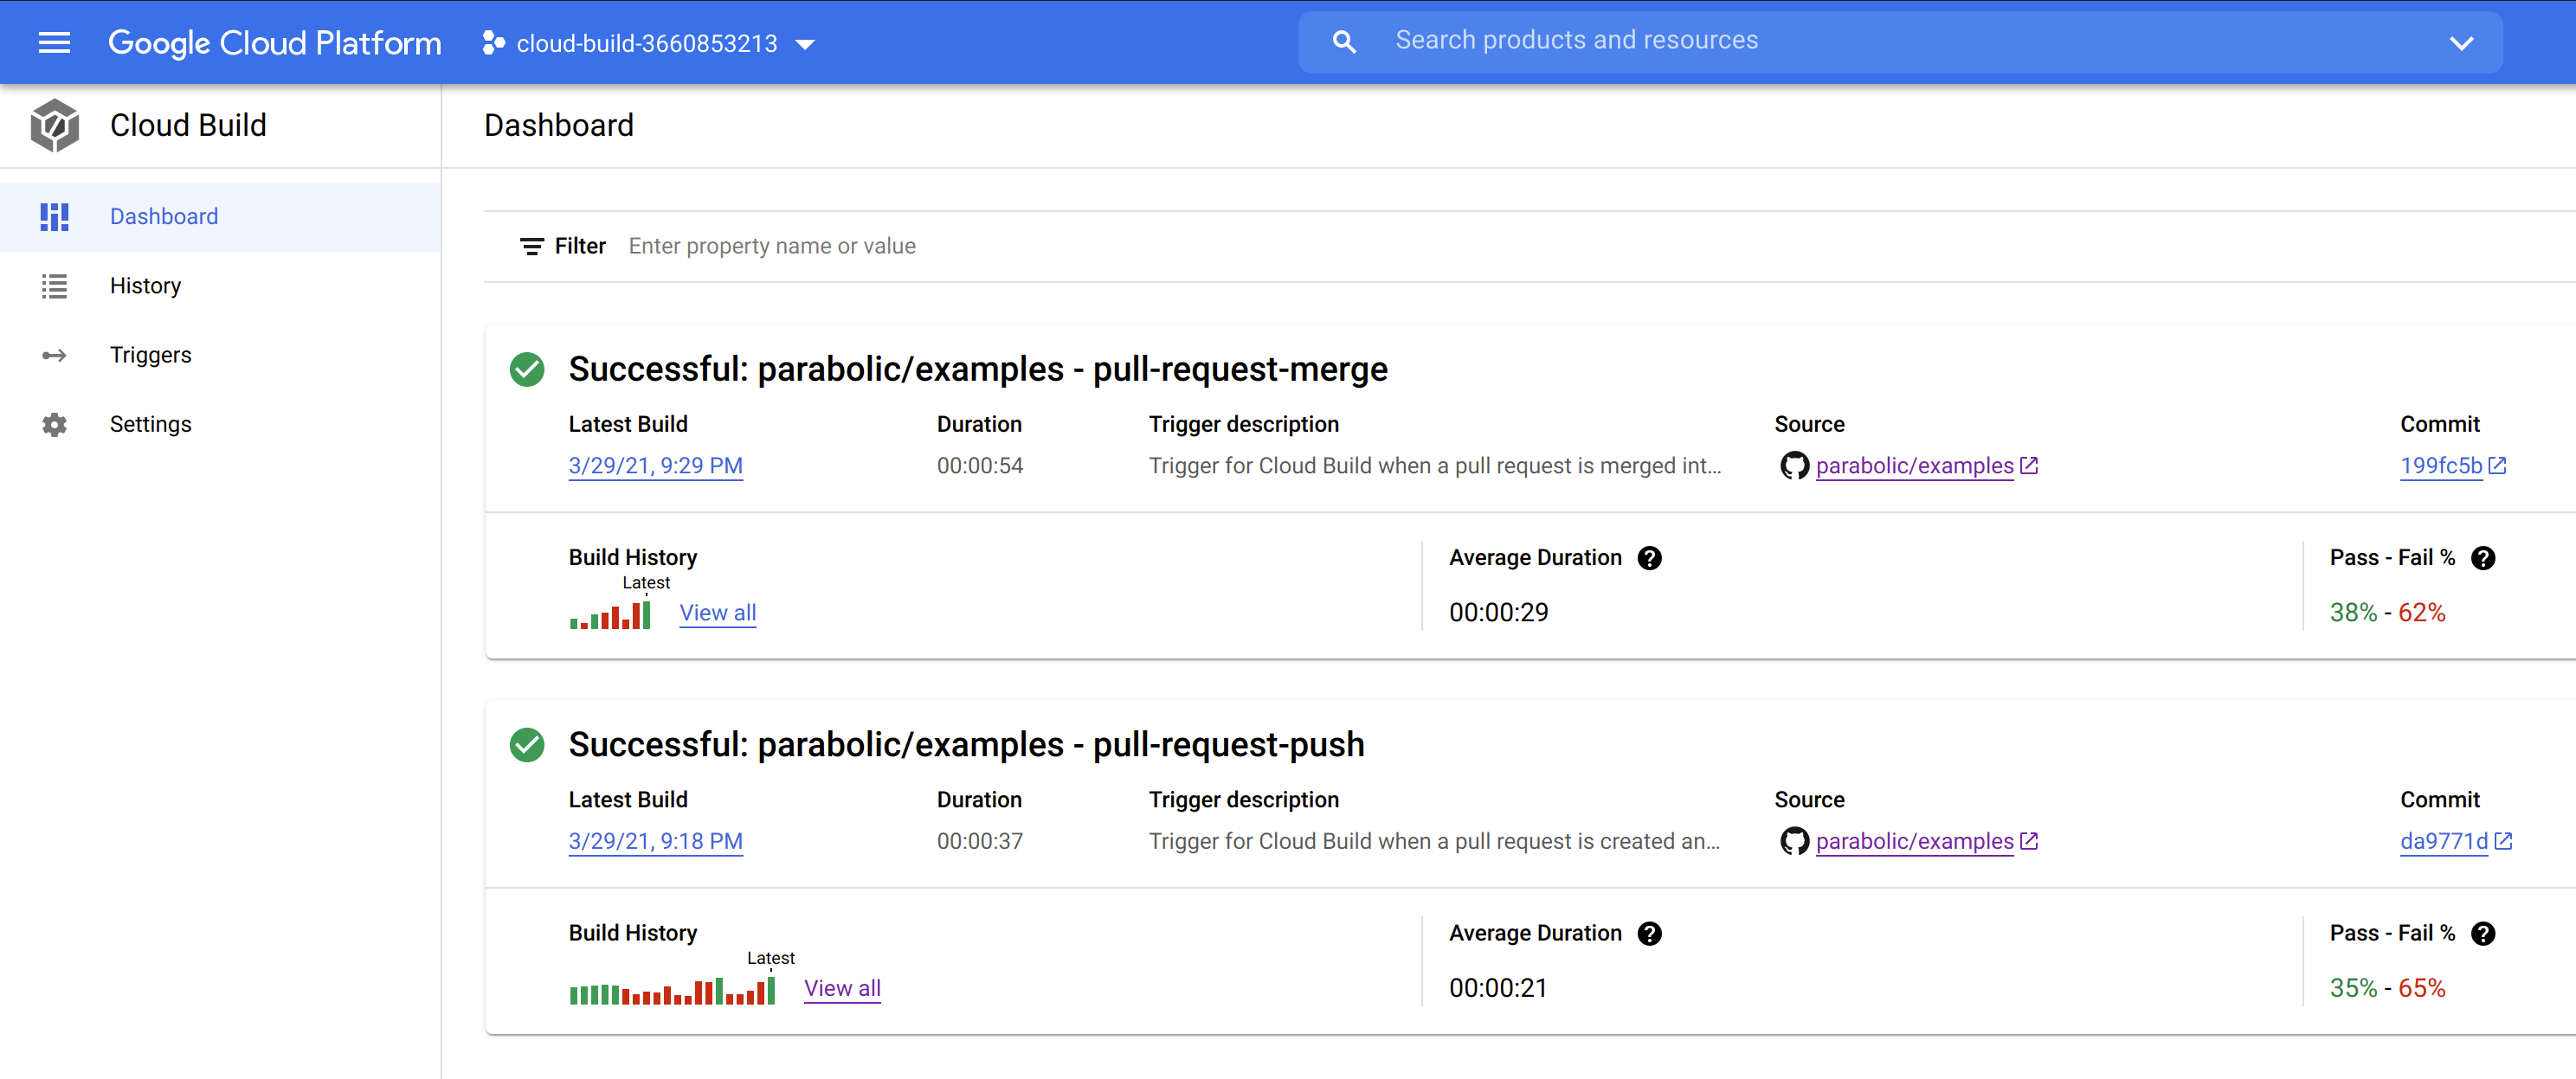 Figure 3. Cloud Build Triggers.
There are two Cloud Build triggers, dubbed pull-request-push and pull-request-merge. As the names imply, they get triggered upon creation/pushing or merging a pull request into master. pull-request-push is the development phase and pull-request-merge is the deployment phase.
For more information on how to use Cloud Build triggers, consult GCP’s documentation.
Only fmt, validate, and plan run as build steps for simplicity’s sake. Nothing prevents us from adding more checks or tests, though.
pull-request-push (Development phase)
Cloud Build starts this trigger upon creation or push to a PR. It executes two steps, Terraform checks (fmt, validate) and Terraform plan (init, plan).
pull-request-merge (Deployment phase)
Cloud Build starts this trigger upon push/merge to master. It executes three steps, Terraform checks (fmt, validate), Terraform plan (init, plan) and Terraform apply. The apply is running a plan file from the previous step to make sure it executes the changes the previous step, Figure 6.
- id: 'terraform-apply'
  waitFor:
    - 'terraform-init-plan'
  name: 'alpine:3.13.3'
  volumes:
    - name: 'terraform_plan_files'
      path: '/var/terraform_plan_files'
  dir: 'terraform/iac-pipelines-with-terraform-and-cloud-build/workloads'
  entrypoint: 'sh'
  args:
    - '-c'
    - |
        set -eo pipefail

        apk add git bash curl
        git clone https://github.com/tfutils/tfenv.git /opt/.tfenv
        ln -s /opt/.tfenv/bin/* /usr/local/bin

        for folder in $(ls .); do
          echo "+-------------------------------------------+"
          echo "Applying state ${folder} "
          echo "+-------------------------------------------+"

          cd $folder
          tfenv install
          terraform init
          terraform apply \
            -auto-approve \
            "/var/terraform_plan_files/${folder}_${BUILD_ID}_${PROJECT_NUMBER}.plan"
          cd -
        done
Figure 6. Cloud Build "terraform-apply" step.
Terraform versioning
I am using Alpine Linux for the running environment. The reason for that is easier Terraform management. I constrain the minor version within the state,
terraform {
  required_version = ">= 0.14"
}
and I use tfenv to pin the patch version.
$ cat .terraform-version
0.14.9
With this approach when updating Terraform, I do not need to change the trigger configuration files and there is no additional logic to install the correct version except executing tfenv install, Figure 4.
Pre-packaging a container image is also something that should be considered.
+-------------------------------------------+
Planning state prod-1549784393
+-------------------------------------------+
Installing Terraform v0.14.9
Downloading release tarball from https://releases.hashicorp.com/terraform/0.14.9/terraform_0.14.9_linux_amd64.zip

Downloading SHA hash file from https://releases.hashicorp.com/terraform/0.14.9/terraform_0.14.9_SHA256SUMS
No keybase install found, skipping OpenPGP signature verification
terraform_0.14.9_linux_amd64.zip: OK
Archive:  tfenv_download.HLdilD/terraform_0.14.9_linux_amd64.zip
  inflating: terraform
Installation of terraform v0.14.9 successful. To make this your default version, run 'tfenv use 0.14.9'
Figure 4. Cloud Build installing Terraform with Tfenv.
Terraform execution
In every Cloud Build step, there is a loop that goes to each Terraform state folder and execute the specified actions, Figure 5.
for folder in $(ls .); do
  echo "+-------------------------------------------+"
  echo "Fmt/Validate state ${folder} "
  echo "+-------------------------------------------+"

  cd $folder
  tfenv install
  terraform fmt -recursive -check -diff .
  terraform init -backend=false
  terraform validate .
  cd -
done
Figure 5. Cloud Build step "ftm-validate".
This is how it all looks on GitHub when working in a real-life scenario. Terraform fmt and validate were failing the checks until pushed the fixes, Figure 7.
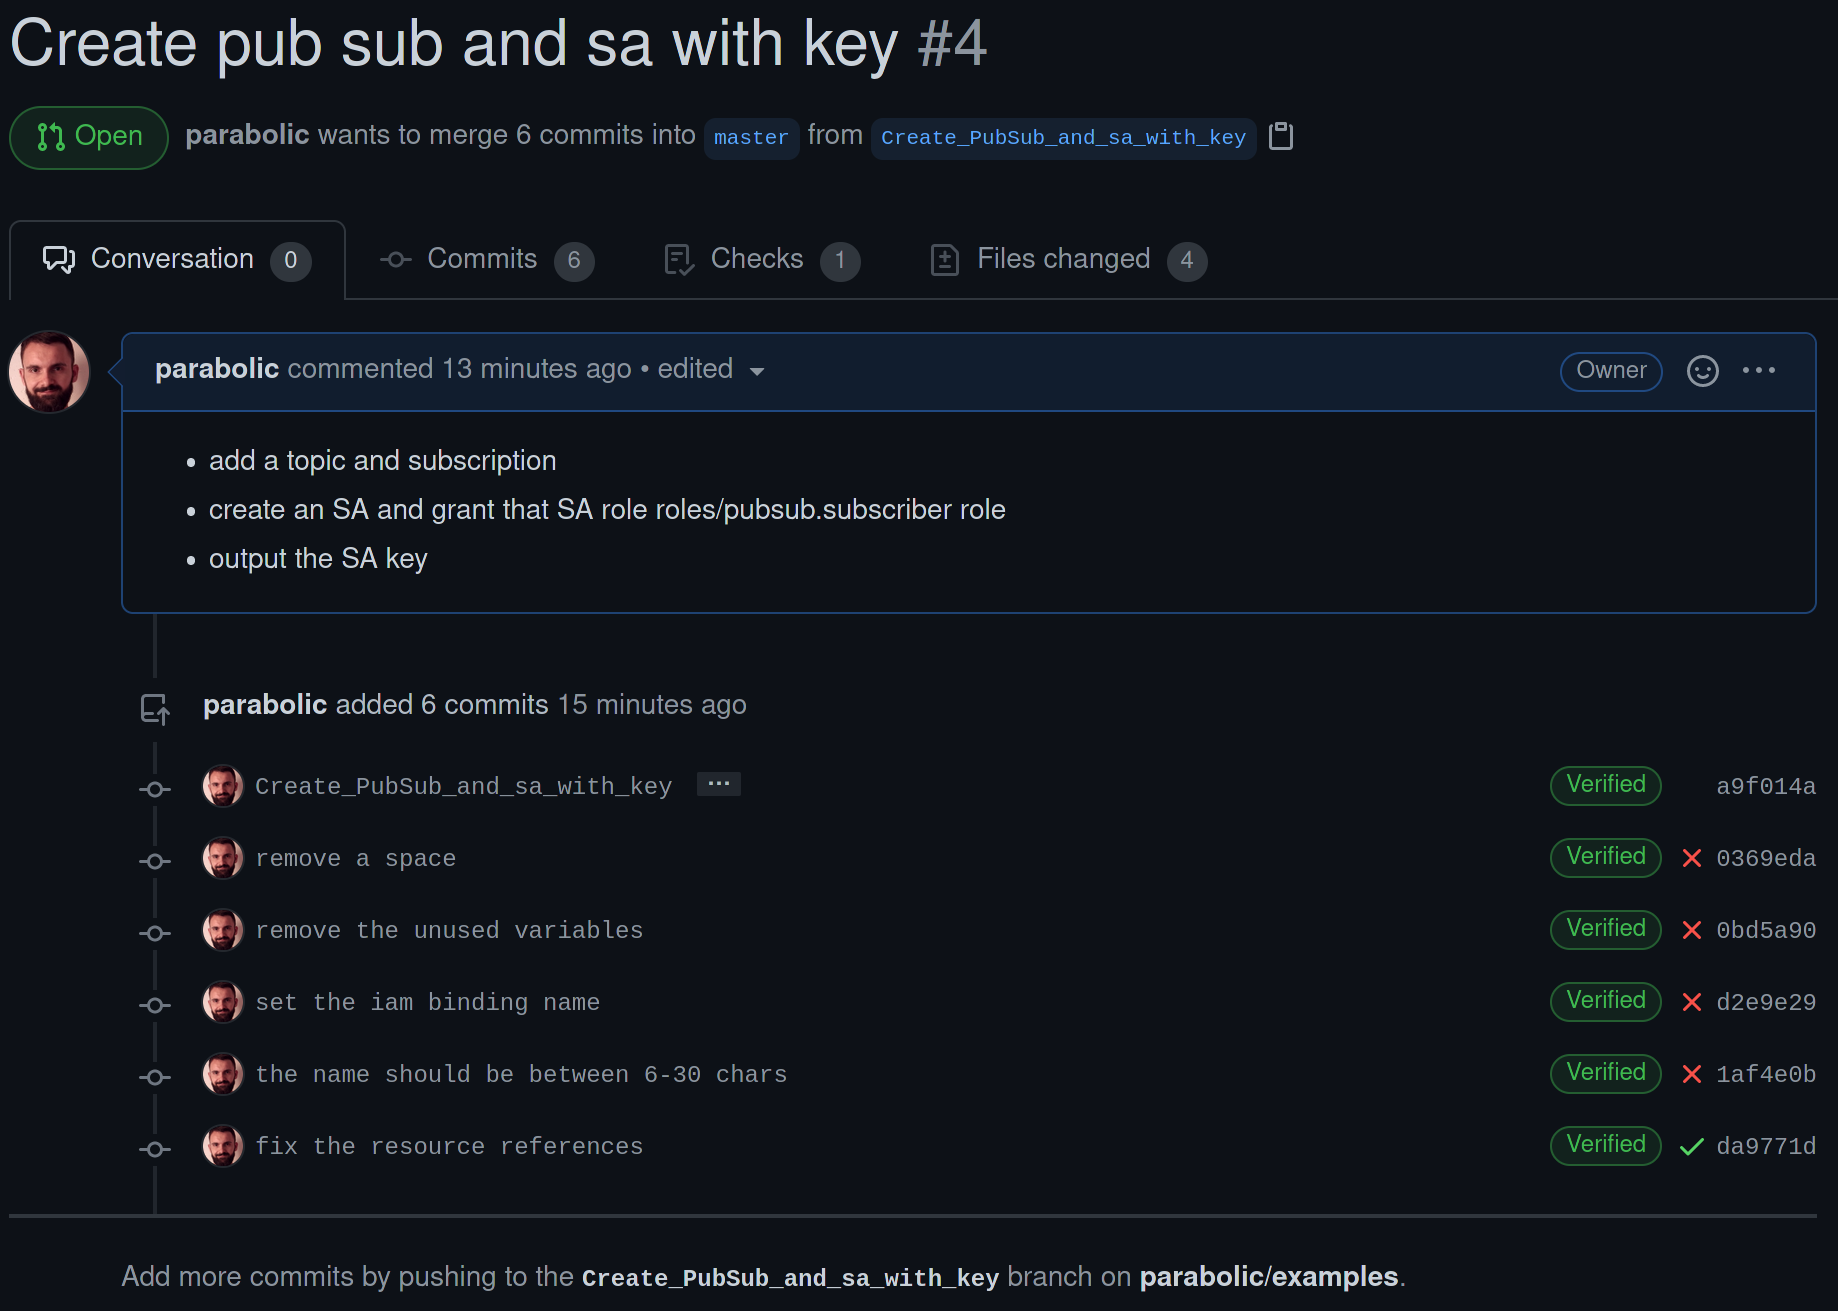 Figure 7. GitHub checks.
Initializing the projects Terraform state
$ terraform apply -var=billing_account=<SOME_BILLING_ACCOUNT>
- Comment the Cloud Build triggers. They cannot be creation until the GitHub repository is connected.
- Comment the remote state configuration. We cannot have a remote state until the storage bucket is created.
- Apply the Terraform state.
- This will (amongst other things):
- Create the three projects.
- Enable the Cloud Build API.
- Give Cloud Build’s service account owner permissions for the projects that host the workloads prod-1549784393, and stag-3380426388.
- This will (amongst other things):
- Connect GitHub and Cloud Build assuming that the GitHub repository hosts the same directory structure and template names, Figure 8.
- Uncomment the Cloud Build triggers.
- Uncomment the remote state configuration.
- Init and Apply Terraform.
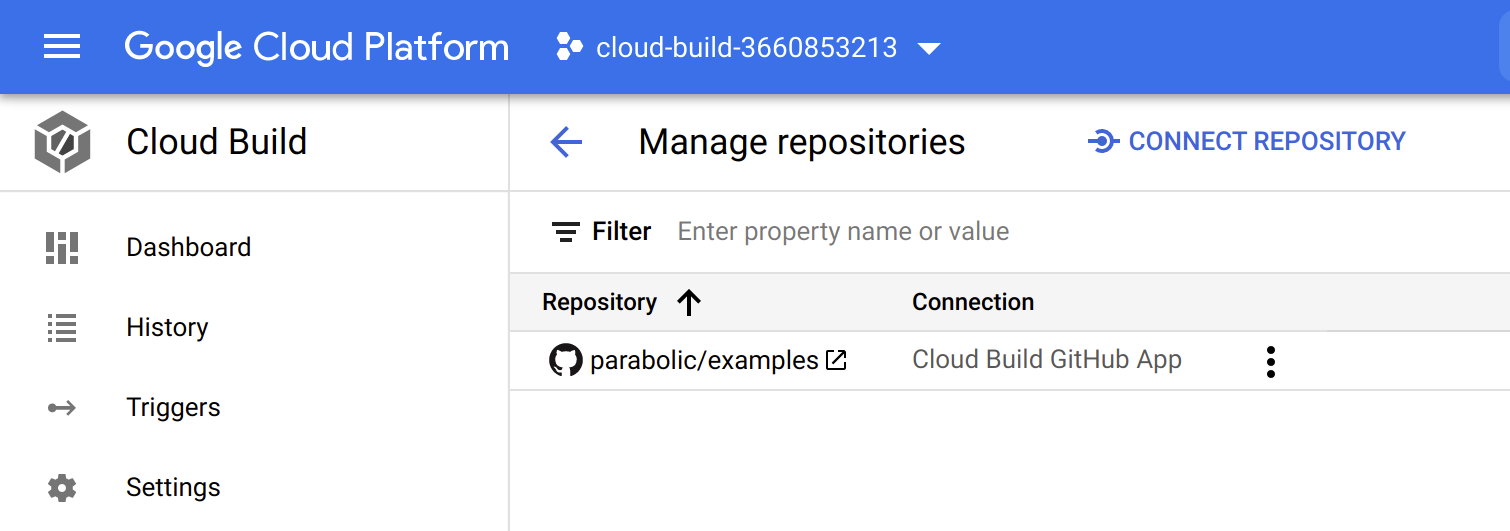 Figure 8. GitHub Repository and Cloud Build.
Initializing the prod-1549784393, stag-3380426388 Terraform states
$ terraform apply
- Comment the remote state configuration in each folder/state. We cannot have a remote state until the storage bucket is created.
- Init and Apply Terraform.
- Uncomment the remote state configuration.
- Init and Apply Terraform.
That is it! With this, we have now successfully created an IaC pipeline with Cloud Build and GitHub.
Conclusion
Evaluating Cloud Build was a fun task and like every solution out there, it has its strengths and weaknesses.
Pros:
- Secure
- If you run your workloads on GCP this would be the most secure approach because the builds do not leave Google Cloud’s “ecosystem”.
- Fast
- Cleary, builds were blazingly fast even with installing third-party software during execution, Figure 9.
Cons:
- File filters do not work for every event:
- Included files and Ignored files can only be specified if Push to a branch is selected as your Event. In my case, I could only specify this filter in the pull-request-merge trigger.
- No interactive build steps:
- Running Terraform with the
-auto-aproveattribute can be very dangerous an interactive approval step when applying in production would be very nice to have.
- Running Terraform with the
- Cannot establish an SSH (Debug) session into the build environment.
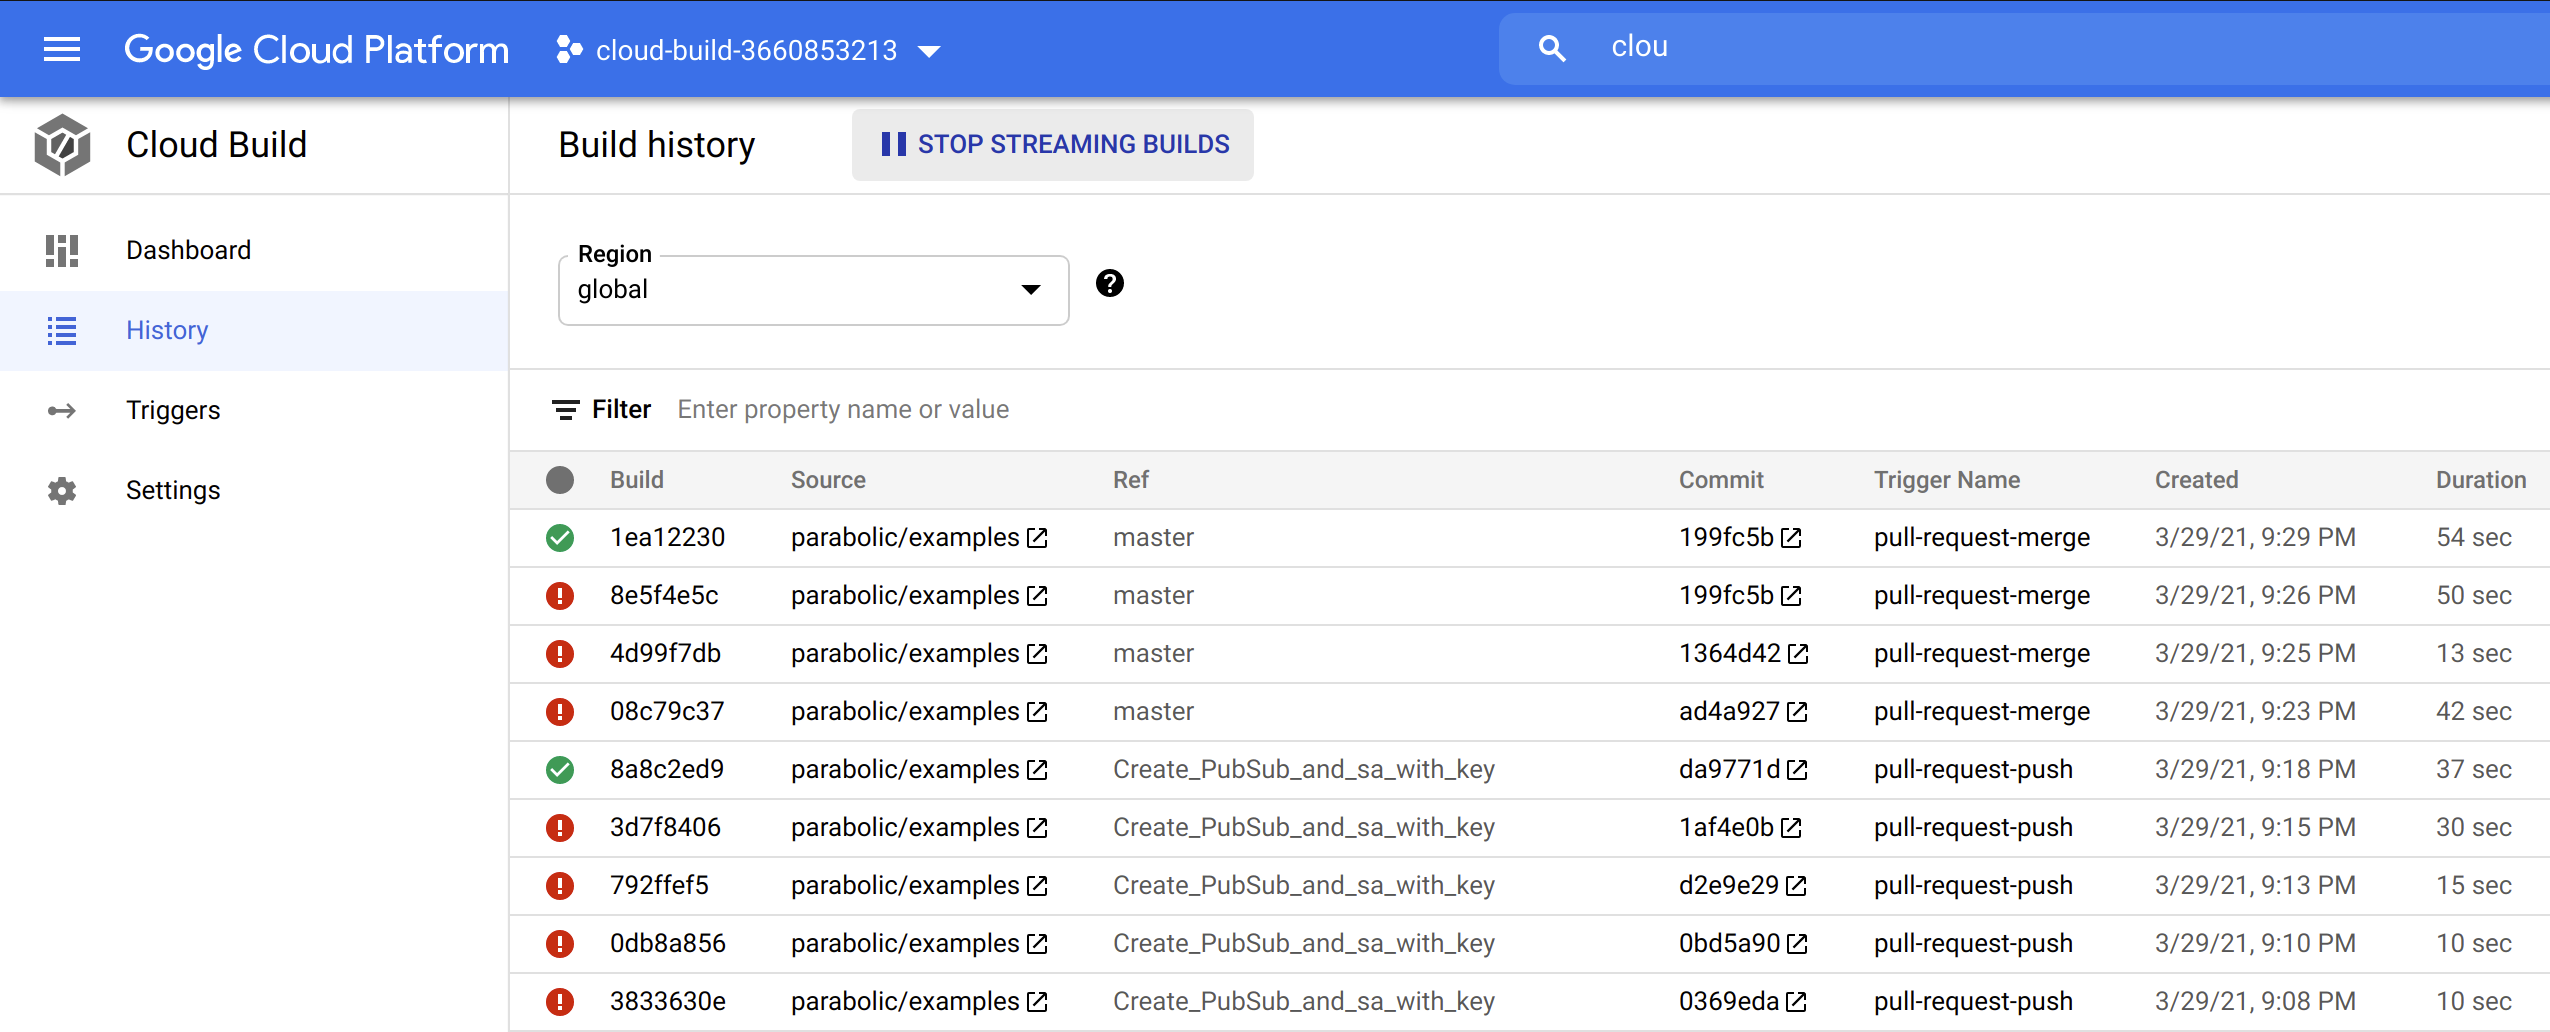 Figure 9. Cloud Build Execution times.
That is all for now. For any suggestions or questions, feel free to contact me. If you like what I am doing, don’t forget to share this blog post.
