Google Cloud Workload Identity with Kubernetes and Terraform
“The only truly secure system is one that is powered off, cast in a block of concrete and sealed in a lead-lined room with armed guards.” - Gene Spafford
In this blog post, I will write about improving one’s security posture by running Google Kubernetes Engine (GKE) workloads on the Google Cloud Platform (GCP). My focus falls mainly on authentication: the section between the Identity and Access Management (IAM) service and the GKE workloads. But first, I need to set the stage.
Service Accounts, IAM Roles, and Key Pairs
Service Accounts
Service accounts are types of accounts typically used by applications or so-called workloads.
With a service account, the application can authenticate to other GCP resources or APIs. It is an entity defined by GCP and resides in the IAM service. Its email address representation, e.g. sa-name@gcp-project-id.iam.gserviceaccount.com, is unique to a given GCP account.
IAM Roles
A service account is usually granted an IAM role that defines the authorization scope for other GCP resources. With that said, we can safely assume that a service account deals with authentication and the IAM role deals with authorization.
Public-Private Key Pairs
Each service account correlates with a public/private RSA key pair. Depending on how the private key is generated, it diverges into two types:
- Google-managed key pairs.
- User-managed key pairs.
Google-Managed Key pairs
Are managed by Google, and only the public key can be viewed and verified. The most common use of such keys is for generating short-lived credentials. They are automatically rotated and used for signing and are valid for a maximum of two weeks. Services like App Engine and Compute Engine use Google-managed key pairs. They are my preferred method (it should be everyone’s default). That is because I do not have to care about managing or storing any private keys which are considered sensitive data.
User-Managed Key pairs
Are created and obtained by the user upon request. The private key is called a “service account key” and uses the JSON data format. See Figure 1.
🚫 Never share, nor publicly expose your service account key! 🚫
{
  "type": "service_account",
  "project_id": "some-gcp-project-id",
  "private_key_id": "313eqeq21321dsadsadqwe21213wewdasdaasdws",
  "private_key": "-----BEGIN PRIVATE KEY-----\n-----END PRIVATE KEY-----\n",
  "client_email": "cloudlad@some-gcp-project-id.iam.gserviceaccount.com",
  "client_id": "30348941921832193121",
  "auth_uri": "https://accounts.google.com/o/oauth2/auth",
  "token_uri": "https://oauth2.googleapis.com/token",
  "auth_provider_x509_cert_url": "https://www.googleapis.com/oauth2/v1/certs",
  "client_x509_cert_url": "https://www.googleapis.com/robot/v1/metadata/x509/cloudlad%40some-gcp-project-id.iam.gserviceaccount.com"
}
Figure 1. A user-managed bogus service account key.
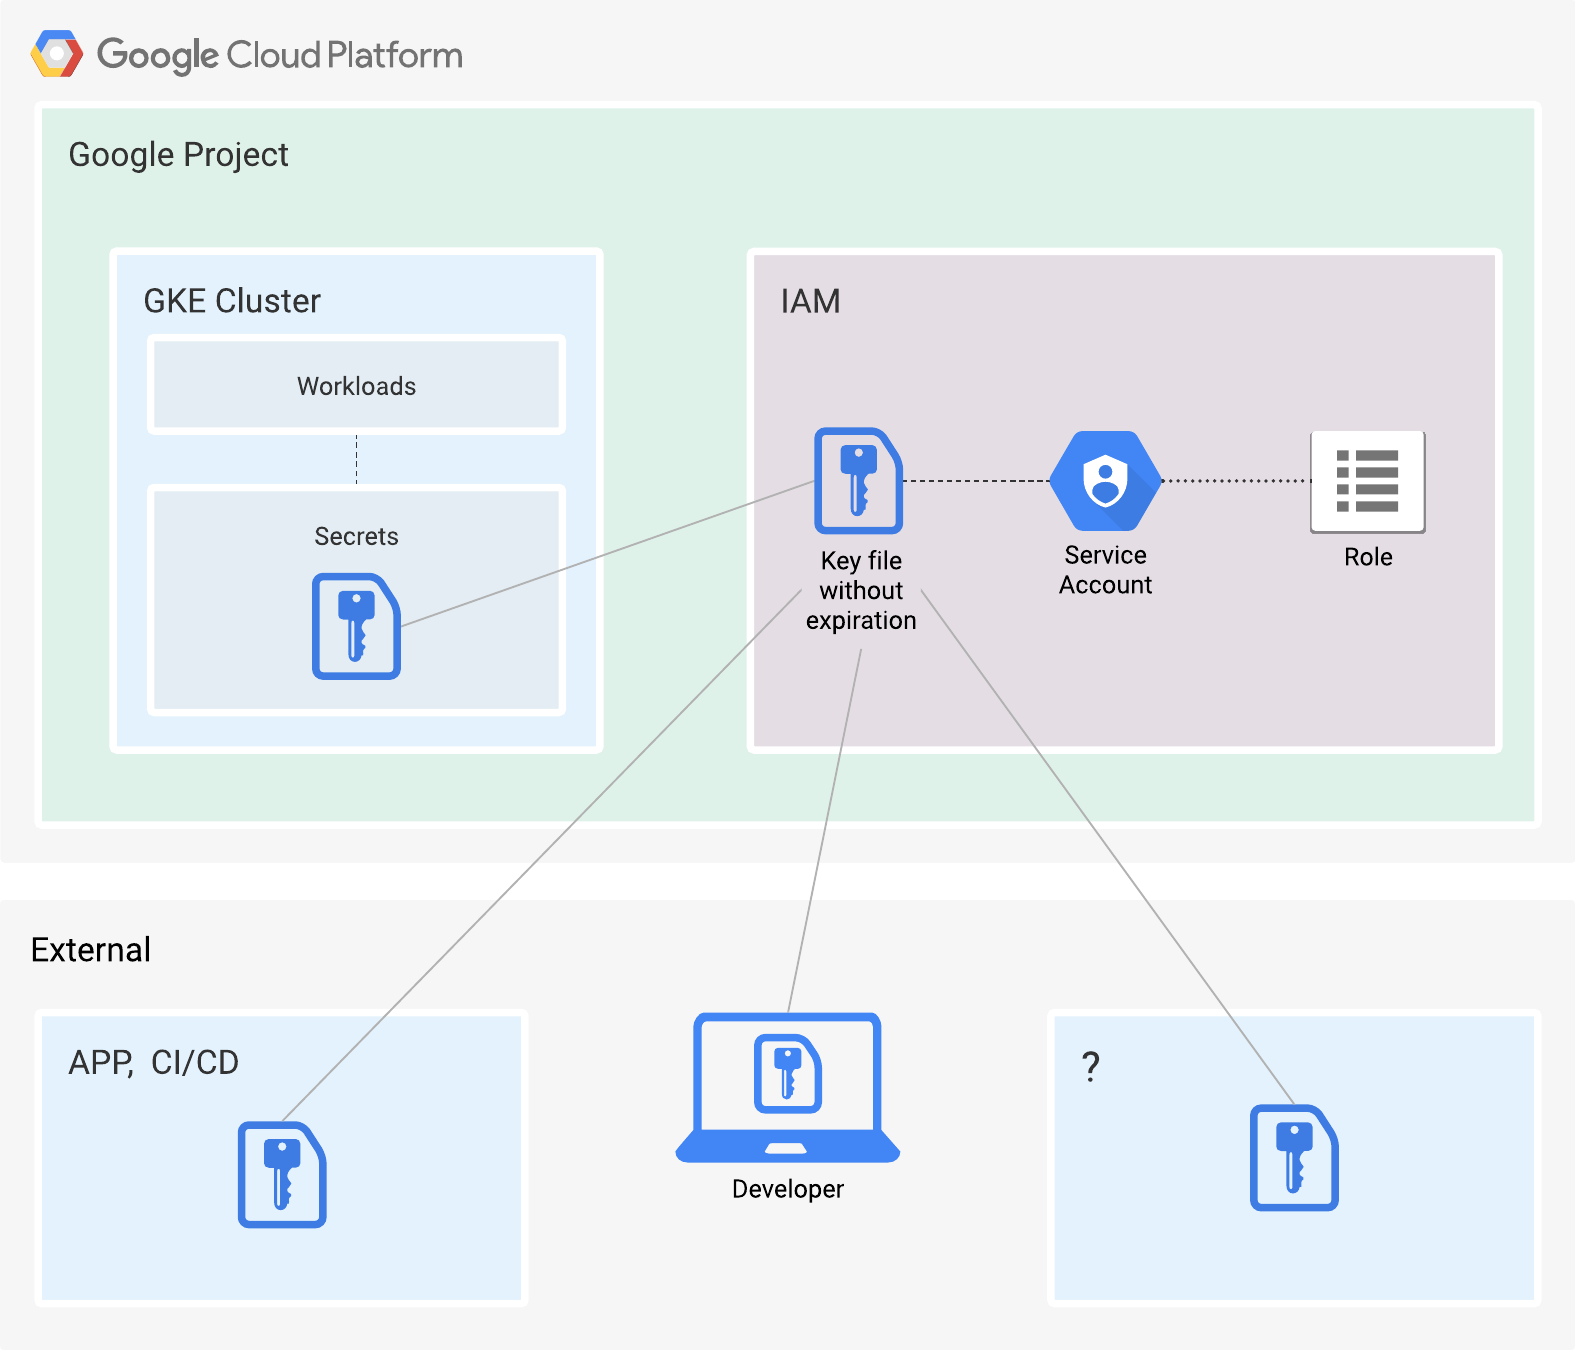
This User-managed key by default has no expiration date. It also inherits the same permissions as the service account. Naturally, such keys are considered a security risk. The responsibility for them falls on the user. See Figure 2.

Figure 2. Places where a service account key might exist.
Why use service account keys?
One of the more common use cases for service accounts is for accessing resources in GCP, be it a Compute Engine VM or a GKE node pool. For clarification, a node pool is a group of VMs sharing the same configuration.
The pitfall here is, in the case of the GKE node pools, all of the pods on the nodes will inherit the permissions assigned to the service account. Let’s assume that application A needs read-only access to PubSub, and application B needs write access to Memorystore (Redis). The applications are both running as pods on nodes in a node pool. If we attach a service account on the node pool level, both applications will inherit the permissions from the attached service account. Both will have unnecessarily broad permissions, increasing the attack surface and risk. The example is only with two applications. A GKE cluster hosts way more, not counting the system pods.
The solution is rather obvious, do not assign permissions on the node pool level.
If I cannot do it on the node level, I would have to do it on the application level. E.g., secrets loaded directly in the pod. The secrets API object in K8s holds a small amount of sensitive data. The data gets put into a running pod or container image, either mounted or exposed as an environment variable.
With this, I am back to square one, user-generated service account keys loaded into pods.
Workload Identity
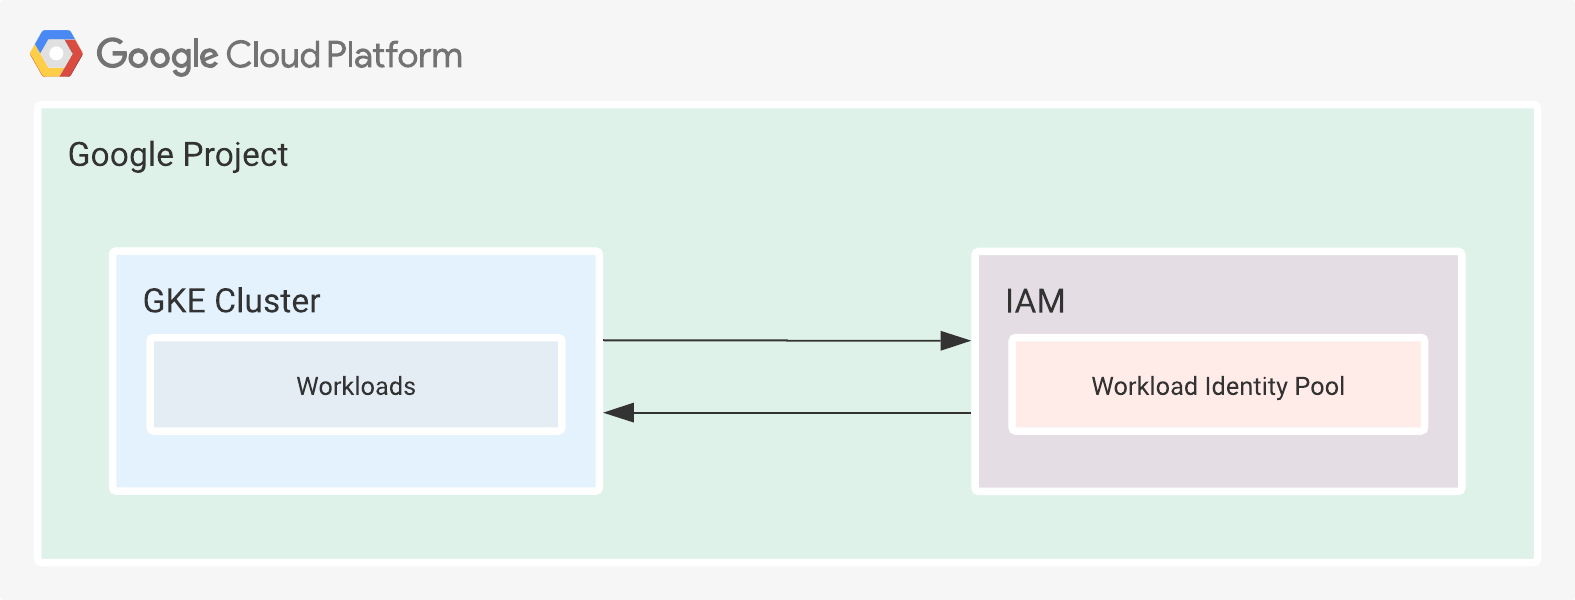
Workload Identity is a process that enables workloads to impersonate (IAM) service accounts to access GCP services. The workloads might or might not be running on GCP. In simpler terms, the workloads assume the authorization scope of a service account and use short-lived credentials that the user does not need to manage in any way. Effectively preventing the leakage of credentials and decreasing the possible attack surface. See Figure 3.

Figure 3. Simplified representation of Workload Identity.
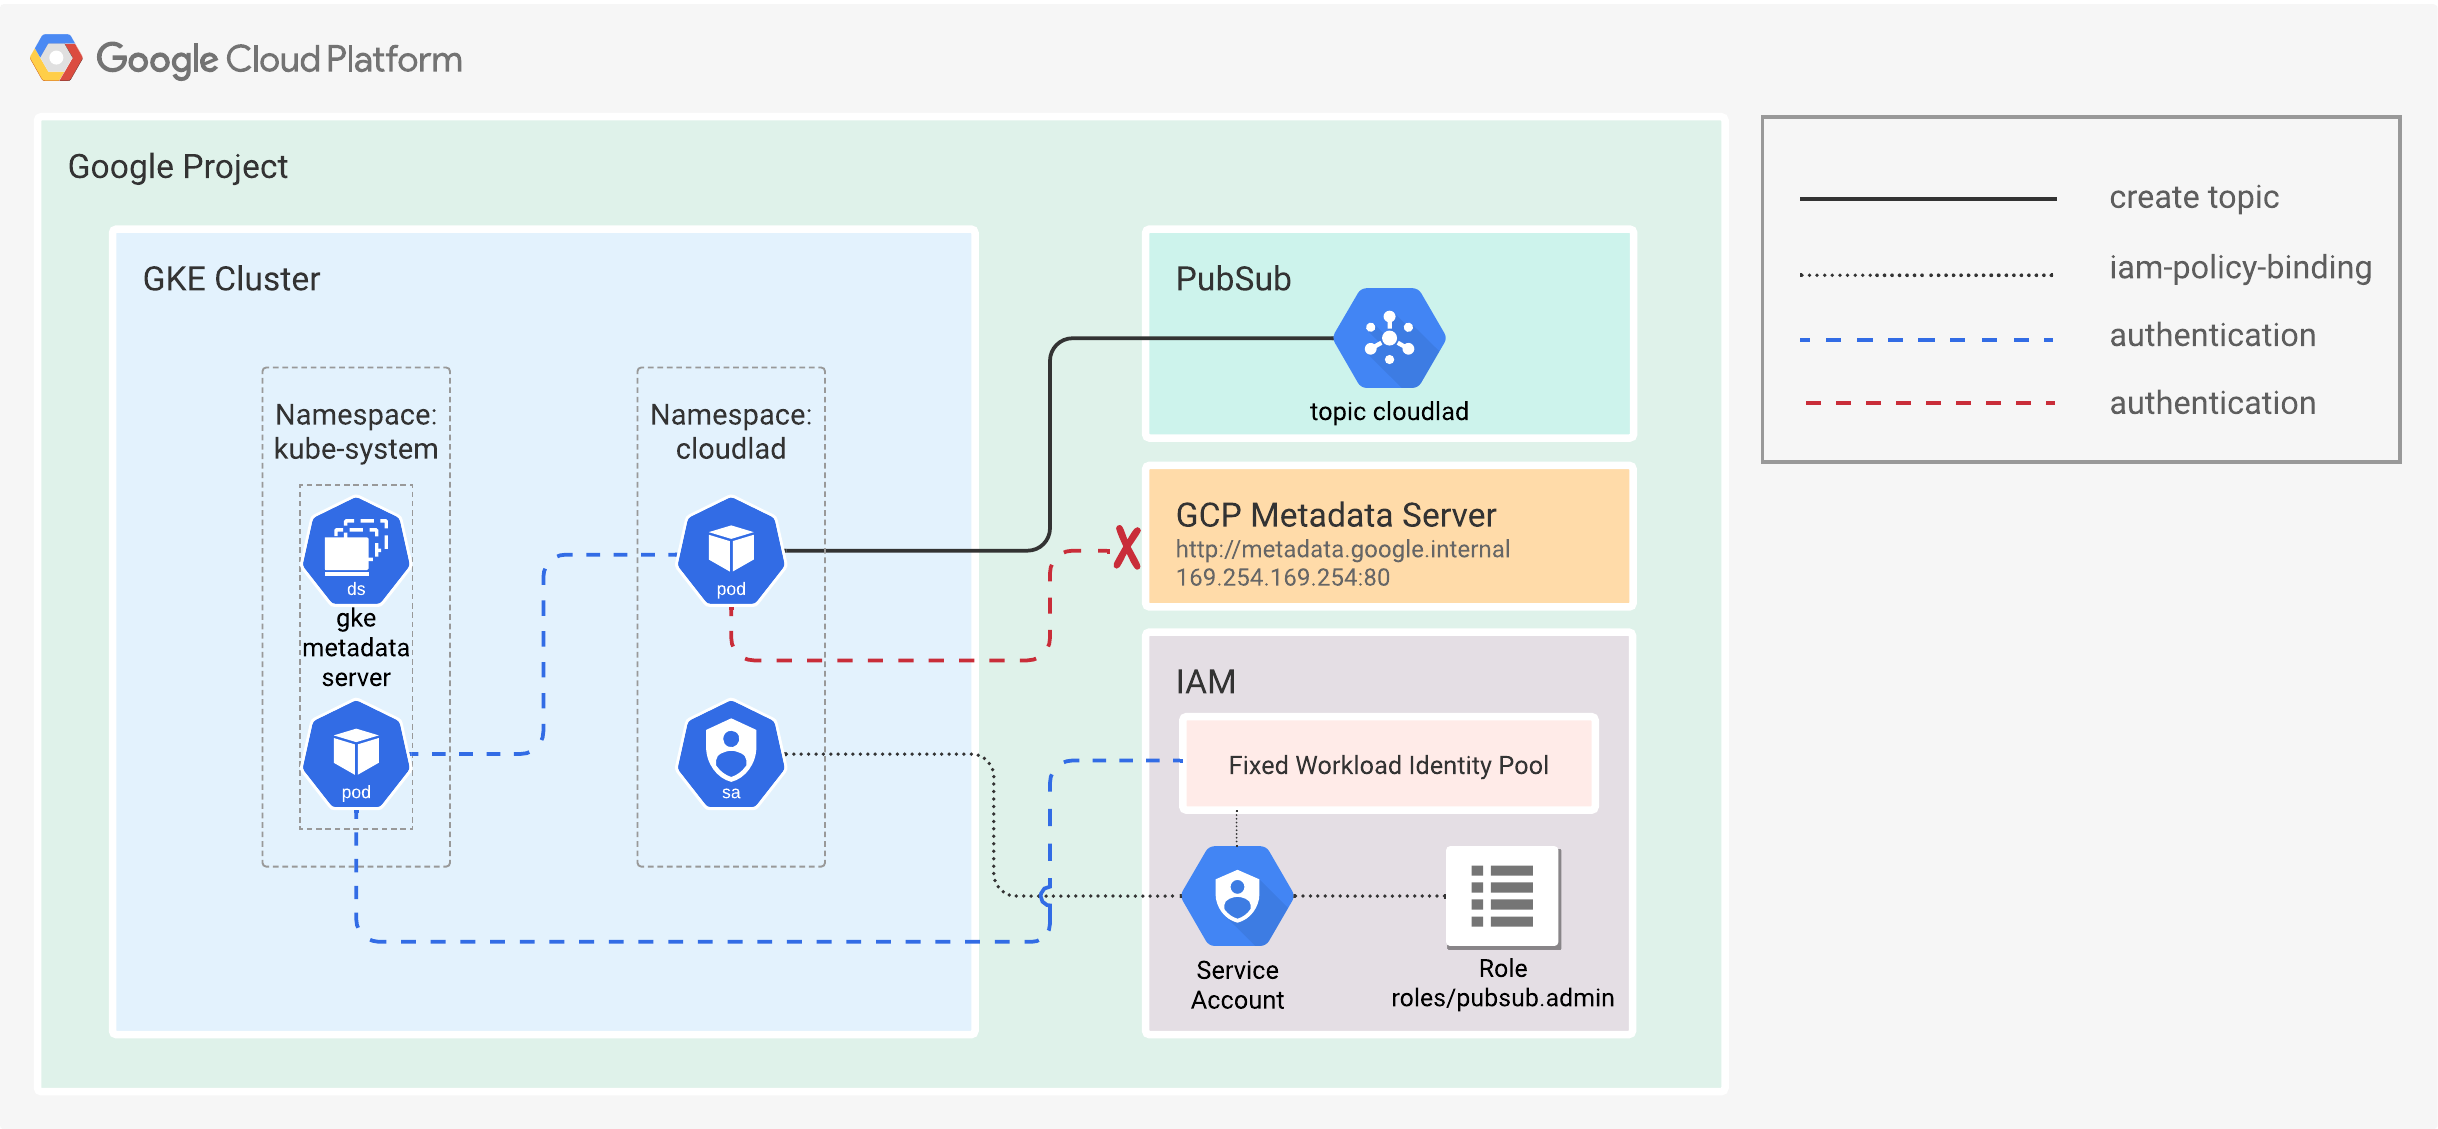
Let me explain this in a bit more detail. By enabling Workload Identity on a cluster, a K8s DaemonSet is deployed, with a pod in the host network. That pod dubbed the GKE metadata server (MDS), runs in the kube-system namespace and intercepts all requests to the GCP metadata server from the other pods (workloads). The pods running on the host network are the exception.
The whole authentication flow consists of a few steps.
- The GKE MDS requests OpenID Connect (OIDC) signed JSON Web Tokens (JWT) from the Kubernetes API server.
- The GKE MDS then requests an access token for the K8s Service Account.
- IAM validates the bindings and OIDC and returns an access token to the MDS.
- That access token will be sent back to IAM, and a short-lived GCP service account token will be issued.
- It is then returned to the GKE MDS and passed on to the workload.
Finally, the pod can use the short-lived service account token to access GCP resources. See Figure 4.

Figure 4. Workload Identity.
Practical Example In Terraform
What good is theory without the practical part?
For that, I will be using Terraform and GCP to show the GKE Workload Identity in action.
From this point on, I will assume that the reader has the following:
-
Terraform 1.1 or older and gcloud CLI installed.
-
Functional GCP credentials (hopefully not configured via a user-managed service account key), authorized for creating and managing GCP projects, including all of its underlying resources.
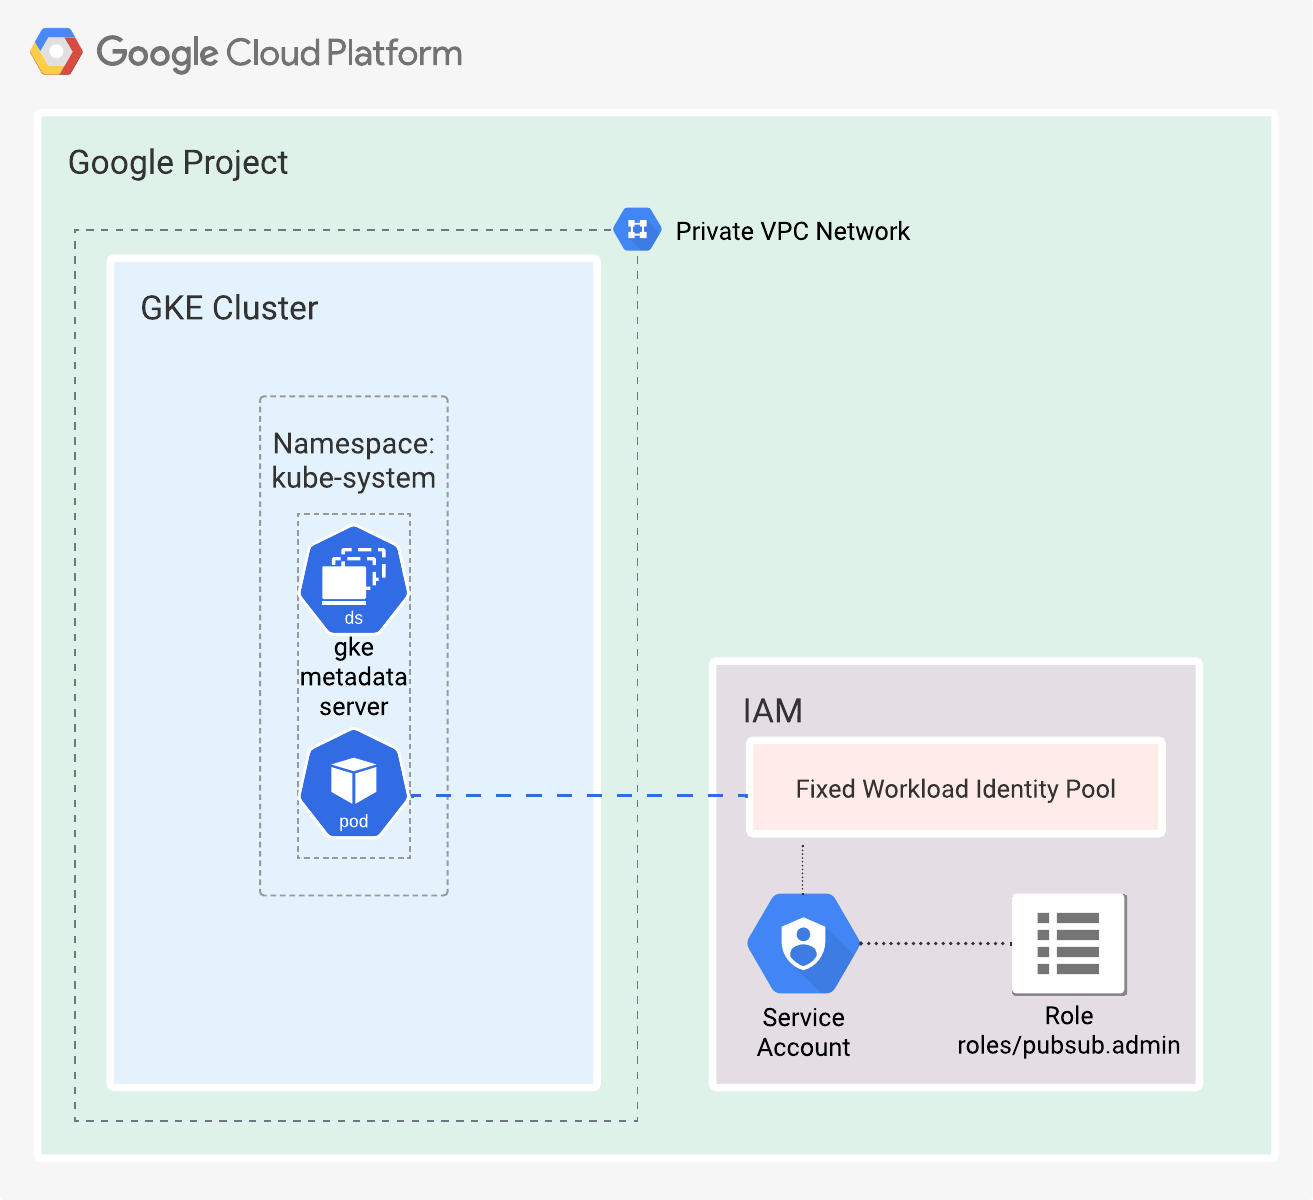
I’ve made a Terraform root module that creates a:
- GCP project (it can also reside under an Organization folder).
- VPC with private subnets.
- Private GKE Cluster with Workload Identity enabled.
- Node pool with a Workload Identity enabled in
GKE_METADATAmode. Google recommends including this attribute, so node creation fails if Workload Identity is not enabled on the cluster. - A shell script named
k8s.shfor the creation and configuration of resources inside the GKE cluster.
See Figure 5.

Figure 5. Simplified representation of the cloud resources created by the Terraform root module.
For more details about the module and its configuration, refer to the README.md.
I would have preferred to create all of the resources in one go, but unfortunately, it is not possible with Terraform’s CRUD cycle. The problem is that the K8s provider cannot authenticate against the GKE cluster in one apply run. That makes perfect sense because the GKE cluster is not present in the application stage, and the K8s provider cannot authenticate.
To programmatically create all of the resources, I use the local_file provider to generate a helper bash script from a Terraform template. The bash script k8s.sh will appear in the working directory of the root module after a successful apply run. It can be overiden to any valid path in the Operating System.
When Terraform apply finishes, the k8s.sh shell script will be present in the working directory. When executed, it will create the cloudlad namespace, a service account, and the annotation for the said service account. Lastly, it will start a pod with the annotated service account attached.
Because of the pod spec override with the annotated service account, the pod itself will inherit the attached role to the IAM service account from the Terraform root module. See Figure 6.
#!/usr/bin/env bash

set -ex -o pipefail -o nounset

K8S_NAMESPACE="cloudlad"
K8S_SERVICE_ACCOUNT="cloudlad"
GCP_REGION="europe-west3"
CLUSTER_NAME="cloudlad-2-ringtail"
GCP_PROJECT_ID="workload-identity-2-ringtail"
K8S_CONTEXT="gke_workload-identity-2-ringtail_europe-west3_cloudlad-2-ringtail"
GCP_SERVICE_ACCOUNT="cloudlad-2-ringtail-k8s@workload-identity-2-ringtail.iam.gserviceaccount.com"

gcloud container clusters get-credentials "$CLUSTER_NAME" --project="$GCP_PROJECT_ID" --region="$GCP_REGION"

kubectl config use-context "$K8S_CONTEXT"

kubectl create namespace "$K8S_NAMESPACE"

kubectl create serviceaccount "$K8S_SERVICE_ACCOUNT" \
    --namespace="$K8S_NAMESPACE"

kubectl annotate serviceaccount "$K8S_SERVICE_ACCOUNT" \
    --namespace="$K8S_NAMESPACE" \
    iam.gke.io/gcp-service-account="$GCP_SERVICE_ACCOUNT"

kubectl run --image=google/cloud-sdk:slim \
    --namespace="$K8S_NAMESPACE" \
    --overrides="{ 'spec': { 'serviceAccount': $K8S_SERVICE_ACCOUNT } }" \
    cloudlad -- sleep infinity
Figure 6. Helper shell script for programmatically creating the K8s resources, valid only for a single Terraform state.
When I execute the k8s.sh script, the K8s Service Account will get annotated with a key: iam.gke.io/gcp-service-account and a value: cloudlad-2-ringtail-k8s@workload-identity-2-ringtail.iam.gserviceaccount.com. The annotation enables the K8s service account to inherit the same Authorization scope from the IAM Service account. See Figure 7.
$ kubectl -n cloudlad get serviceaccounts cloudlad -o json
{
    "apiVersion": "v1",
    "kind": "ServiceAccount",
    "metadata": {
        "annotations": {
            "iam.gke.io/gcp-service-account": "cloudlad-2-ringtail-k8s@workload-identity-2-ringtail.iam.gserviceaccount.com"
        },
        "creationTimestamp": "2022-02-22T21:28:59Z",
        "name": "cloudlad",
        "namespace": "cloudlad",
        "resourceVersion": "9849",
        "uid": "f29f981f-28fc-4ca2-ba35-31dd42ff8e7a"
    },
    "secrets": [
        {
            "name": "cloudlad-token-thlzr"
        }
    ]
}
Figure 7. Service Account annotation with kubectl.
You might ask yourself, “OK, what now?” Checking whether the coupling between GCP IAM and GKE works is straightforward. The newly created pod runs indefinite sleep. And the container is started from the official GCP SDK image, meaning the gcloud CLI is readily available.
I will execute an interactive shell in the running container. Then check the available service accounts, and finally, create a PubSub topic. It is all possible because the pod inherits the roles/pubsub.admin role. See Figure 8.1.
$ kubectl exec --stdin --tty -n cloudlad cloudlad -- bash
root@cloudlad:/# curl -H "Metadata-Flavor: Google" http://169.254.169.254/computeMetadata/v1/instance/service-accounts/
cloudlad-2-ringtail-k8s@workload-identity-2-ringtail.iam.gserviceaccount.com/
default/
root@cloudlad:/# gcloud pubsub topics create cloudlad
Created topic [projects/workload-identity-2-ringtail/topics/cloudlad].
Figure 8.1 Creating a PubSub Topic with Workload Identity from a running pod.
The informational message from the gcloud CLI confirms that the creation of the PubSub topic is without issues. Checking the GCP console whether the PubSub topic is present wouldn’t hurt. See figure 8.2.

Figure 8.2 PubSub Topic created with Workload Identity in the GCP console.
And with this, I have confirmed that Workload Identity is set up and is working.
That is all. I hope that this blog post demystifies GCP’s Workload Identity a bit. As always, feel free to contact me with any ideas, info, and suggestions. Don’t forget that sharing is caring!