Docker persistence for local development

Containers and data persistence
In this blog post we will be exploring the possibilities to manage, persist and share data between a host and a container by utilizing a simple pattern dubbed “host based data persistence”.
Before I start diving into technicalities I reckon it is better to clarify a few things so that readers from all levels are on par with what I will be explaining.
The following excerpt is taken from the docker documentation:
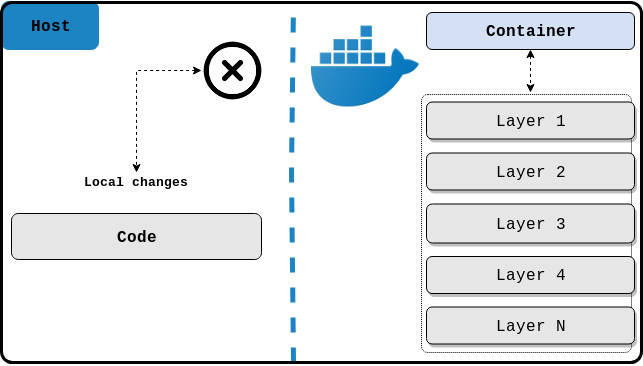
By default all files created inside a container are stored on a writable container layer.
But what does this actually mean? Taking into account that the docker layers reside on the host system under /var/lib/docker/{storage-driver-name}, where storage-driver-name can be any of the supported storage drivers for docker, it means that all the data that gets copied or written inside the container will not persist. At least not in the way we expect it to. Furthermore, the fact that it is stored somewhere on the host system makes it even harder to manage or migrate.
This behavior somewhat explains why we should not run applications that have a state on a production environment in docker unless we absolutely know what we are doing. But that does not stop us from doing so on a testing environment, let’s say like a local dev setup.
Read on to see how I have implemented this pattern in docker.
Question time!
Q: When a file gets created by the process that runs inside the container, which UID and GID will it get assigned?
A: It will have the UID and GID of the user that is set with the USER instruction in the Dockerfile or 0 (the root user) if the USER instruction is not specified.
Obstacle
As you might have noticed by now this blog platform runs with Jekyll on GitHub. Because Jekyll is a gem and behaves like an ordinary ruby application it is the perfect candidate for running in a container. I will not bore you with all the details, but if I have piqued your interest you can have a look at the repository for the complete setup https://github.com/parabolic/parabolic.github.io.
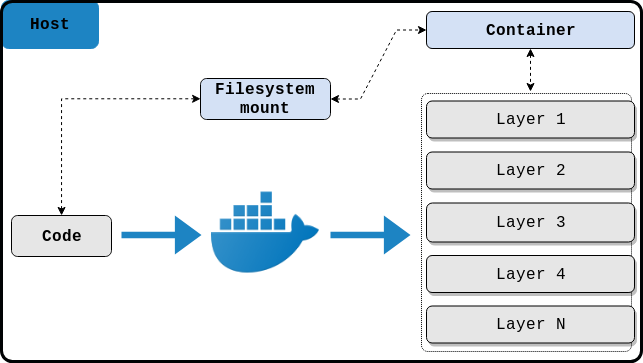
Let us assume that we already have our nice little blog dockerized and in order to see how it looks like, we need to have a look at it before sending it on its merry journey to the GitHub cloud. Jekyll has a nice feature that regenerates the site when files are modified. The argument in question is --watch. That is very pleasant and helpful but with a simple docker setup where we copy the needed files upon build time inside the container, anything that we change on the host after the container is started is not going to be updated to the container layer that we wrote the data to, consequently rendering Jekyll’s regeneration feature rather useless.

This is easily solvable by mounting a volume from the root level of the project to the running container and Jekyll will be able to detect the changes done from the host, but we will soon find out that all the files that were created by the dockerized Jekyll app on the host system will be owned by the root user or any other user rather that the one that we are logged into our system with. This is normal behavior but it makes matters very inconvenient by having to chown the files back to our current system user.
Note:
The solution that I am about to explain can be used for other web applications too. If we want our changes to be conveyed to the running application inside the container immediately and with the proper UID and GID set, we should have a similar implementation.
Solution
It is apparent that we would need to somehow sync the correct UID and GID between the host and the container, otherwise we would need to manually change the ownership back to our system user with the chown command.
In order to do so, some extra work needs to be done. I am usually running and building docker with docker-compose which will help in leveraging the final result.
Firstly we need to somehow tell the container about our current UID and GID and since docker-compose will be controlling the lifecycle of the container we need to inject said UID and GID from it. It turns out that with docker-compose.yml you can read environment variables which will be passed to the container as arguments (can be used with environment variables as well).
args:
  - UID=${UID}
  - GID=${GID}
We should make sure we are passing those arguments in the Dockefile along with defining the USER instruction.
FROM ruby:2.5.3-alpine3.8

LABEL maintainer.url="https://github.com/parabolic"
LABEL description="A dockerized jekyll that regenerates the site on file change."
LABEL maintainer.name="Nikola Velkovski"

ARG UID
ARG GID

ENV APP_HOME="/app"

RUN apk add --update \
    build-base

WORKDIR ${APP_HOME}

COPY Gemfile* ./

RUN bundle install -j "$(getconf _NPROCESSORS_ONLN)"

# Run as the user with the UID and GID from the arguments.
USER ${UID}:${GID}
Before running the container with docker-compose we need to set the environment variables by sourcing the following bash script docker_env.
export UID="$(id -u)"
export GID="$(id -g)"
And finally, the current directory will be mounted to the working directory inside the container at run time, thus eliminating a layer in the Dockerfile where we copy the code on build time.
volumes:
  - .:/app
After we have set and confirmed all of the configuration above we can just simply execute:
source docker_env && docker-compose up --build
If everything went fine we should see something similar appear on stdoud.
blog_1  | Configuration file: /app/_config.yml
blog_1  |             Source: /app
blog_1  |        Destination: /app/_site
blog_1  |  Incremental build: disabled. Enable with --incremental
blog_1  |       Generating...
blog_1  |        Jekyll Feed: Generating feed for posts
blog_1  |                     done in 0.562 seconds.
blog_1  |  Auto-regeneration: enabled for '/app'
blog_1  |     Server address: http://0.0.0.0:5000
blog_1  |   Server running... press ctrl-c to stop.
This means that the application is running locally and if we open http://localhost:5000 we will see our Jekyll blog.
Some of you might have noticed that I have not created a dedicated user inside the container. I have just instructed the container to use my system UID and GID (which are both 1000). This is because I have found that docker has no problems running any application with a UID and GID that do not exist inside it.
We can see this by running the docker image used in this blog post. Looking at the users on the container, it clearly shows that a user with UID and GID 1000 is not present.
$ docker run -it ruby:2.5.3-alpine3.8 sh

/ # cat /etc/passwd | sort -n -t: -k3
root:x:0:0:root:/root:/bin/ash
bin:x:1:1:bin:/bin:/sbin/nologin
daemon:x:2:2:daemon:/sbin:/sbin/nologin
adm:x:3:4:adm:/var/adm:/sbin/nologin
lp:x:4:7:lp:/var/spool/lpd:/sbin/nologin
sync:x:5:0:sync:/sbin:/bin/sync
shutdown:x:6:0:shutdown:/sbin:/sbin/shutdown
halt:x:7:0:halt:/sbin:/sbin/halt
mail:x:8:12:mail:/var/spool/mail:/sbin/nologin
news:x:9:13:news:/usr/lib/news:/sbin/nologin
uucp:x:10:14:uucp:/var/spool/uucppublic:/sbin/nologin
operator:x:11:0:operator:/root:/bin/sh
man:x:13:15:man:/usr/man:/sbin/nologin
postmaster:x:14:12:postmaster:/var/spool/mail:/sbin/nologin
cron:x:16:16:cron:/var/spool/cron:/sbin/nologin
ftp:x:21:21::/var/lib/ftp:/sbin/nologin
sshd:x:22:22:sshd:/dev/null:/sbin/nologin
at:x:25:25:at:/var/spool/cron/atjobs:/sbin/nologin
squid:x:31:31:Squid:/var/cache/squid:/sbin/nologin
xfs:x:33:33:X Font Server:/etc/X11/fs:/sbin/nologin
games:x:35:35:games:/usr/games:/sbin/nologin
postgres:x:70:70::/var/lib/postgresql:/bin/sh
cyrus:x:85:12::/usr/cyrus:/sbin/nologin
vpopmail:x:89:89::/var/vpopmail:/sbin/nologin
ntp:x:123:123:NTP:/var/empty:/sbin/nologin
smmsp:x:209:209:smmsp:/var/spool/mqueue:/sbin/nologin
guest:x:405:100:guest:/dev/null:/sbin/nologin
nobody:x:65534:65534:nobody:/:/sbin/nologin
/ #
Conclusion
With the solution outlined above we have successfully implemented the host data persistence pattern. We have also heightened our security, solely because the user hasn’t been created in the first place and therefore it has no home directory, no shell or anything else that might get copied from /etc/skel, that is if we do not take extra precaution whilst creating it. As an added bonus we have our application running as a non root user which is one of the simplest and straightforward security practices for docker.
All the configuration files that are mentioned above can be found here https://github.com/parabolic/parabolic.github.io.
That is all for now. If you find this blog post helpful or if you think it can be improved in anyway, I would kindly ask you to provide your feedback and comments! Also please do not forget to share it if you like it!